# 初始化(开发工具)
前言
了解前端项目开发中环境的相关配置,工具的相关使用技巧等,有助于快速解决开发时遇到的各种问题,提高开发效率
# 1.Node.js
注意
实际开发中团队中 node 版本最好保持一致,包括各种环境(dev、sit、uat、生产)中
1.官网下载 Node.js (opens new window)(以 windows 系统 64 位为例)

2.安装 Node.js(注意有时有问题需要注意环境变量的配置)
3.cmd 中查看 node 版本,校验安装成功后,升级 npm
node -v
npm install -g npm@latest # npm i npm -g
1
2
# 2.版本控制
注意
目前推荐使用Git及相关插件,不推荐 SVN 管理代码,但是推荐管理相关技术文档资料
- 版本规范 挑选稳定版本 记录版本号 如果版本升级,需要总结版本差异
# 2.1 安装 Git
- Git 官网 (opens new window)下载 git 进行安装
- 常用命令
- 代码合并提交
- 创建分支、切分支
- 临时存储
苹果系统中使用 homebrew 安装 git
- 安装 homebrew
/bin/zsh -c "$(curl -fsSL https://gitee.com/cunkai/HomebrewCN/raw/master/Homebrew.sh)"
# 3.编辑器
注意
不推荐使用 hbuilder、sublime text、WebStorm、Atom,推荐使用Visual Studio Code,重点关注一些常见的功能(终端、代码对比、批量替换、代码调试)
# 3.1 安装配置 vscode
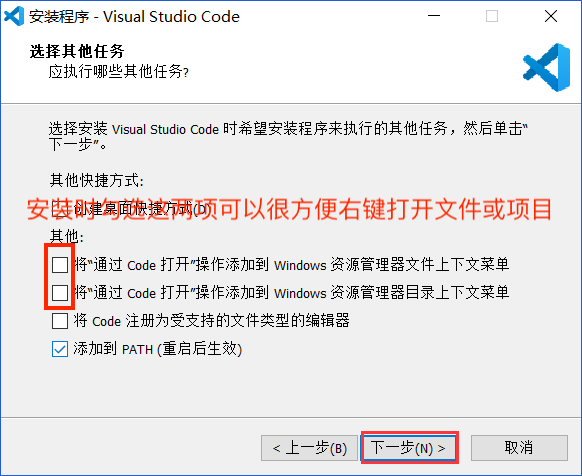
2.安装时勾选选项后,不需要拖动
代码文件、或项目目录到编辑器,就可以直接用鼠标右键打开目标
3.使用自带的终端 + bash 运行命令

建议使用 vscode 自带的终端,快捷键
ctl+~,右边下角操作完成后可以直接运行命令(同 cmd 上操作)
4.安装插件
.vscode/extensions.json
{
    "recommendations": [
          "baoxin.vscode-css-peek-bx",
          "dbaeumer.vscode-eslint",
          "donjayamanne.githistory",
          "eamodio.gitlens",
          "ecmel.vscode-html-css",
          "esbenp.prettier-vscode",
          "formulahendry.code-runner",
          "jasonnutter.search-node-modules",
          "jonnyyu.chrome-app-devtools",
          "kisstkondoros.vscode-gutter-preview",
          "mkxml.vscode-filesize",
          "ms-ceintl.vscode-language-pack-zh-hans",
          "octref.vetur",
          "oouo-diogo-perdigao.docthis",
          "palmpam.vue2-file-peek",
          "pranaygp.vscode-css-peek",
          "ritwickdey.liveserver",
          "tal7aouy.rainbow-bracket",
          "whtouche.vscode-js-console-utils",
          "xyz.local-history",
          "MS-CEINTL.vscode-language-pack-zh-hans",
          "PalmPam.vue2-file-peek",
          "ritwickdey.LiveServer"
    ]
  }
2
3
4
5
6
7
8
9
10
11
12
13
14
15
16
17
18
19
20
21
22
23
24
25
26
27
Vue 2 Snippets:Vue2 代码片段补全Document This: 能够一键给代码中的类、函数加上注释,支持函数声明、函数表达式、箭头函数等Auto Close Tag:自动添加 HTML / XML 关闭标签Auto Rename Tag:自动重命名配对的 HTML / XML 标签Code Runner:运行多种语言的代码片段或代码文件Chinese (Simplified) Language Pack for Visual Studio Code:中文简体语言包Color Info:提供你在 CSS 中使用颜色的相关信息CSS Peek:使用此插件,你可以追踪至样式表中 CSS 类和 ids 定义的地方。当你在 HTML 文件中右键单击选择器时,选择“ Go to Definition 和 Peek definition ”选项,它便会给你发送样式设置的 CSS 代码Debugger for Chrome:前端调试ESLint:EsLint 可以帮助我们检查 Javascript 编程时的语法错误filesize:在底部状态栏显示当前文件大小,点击后还可以看到详细创建、修改时间Git History:以图表的形式查看 git 日志GitLens — Git supercharged:显示文件最近的 commit 和作者,显示当前行 commit 信息HTML CSS Support:html 代码自动补全以及 class 智能提示HTMLHint:HTML 代码格式检测HTML Snippets:代码自动填充Image Preview:鼠标移到路径里显示图像预览JavaScript (ES6) code snippets:es6 代码片段Live Server:浏览器实时刷新Vetur:Vue 语法高亮显示, 语法错误检查, 代码自动补全vscode-fileheader:顶部注释模板,可定义作者、时间等信息,并会自动更新最后修改时间,快捷键: Ctrl+Alt+i (默认信息可在 文件 → 首选项 → 设置 中修改)5.配置参数
settins.json
{
  "editor.quickSuggestions": {
    //开启自动显示建议
    "other": true,
    "comments": true,
    "strings": true
  }, // vscode默认启用了根据文件类型自动设置tabsize的选项
  "editor.detectIndentation": false, // 重新设定tabsize
  "editor.tabSize": 2, // 每次保存的时候自动格式化
  "editor.formatOnSave": true, // 每次保存的时候将代码按eslint格式进行修复
  "eslint.autoFixOnSave": true, // 添加 vue 支持
  "eslint.validate": [
    "javascript",
    "javascriptreact",
    {
      "language": "html",
      "autoFix": true
    },
    {
      "language": "vue",
      "autoFix": true
    }
  ], // 让prettier使用eslint的代码格式进行校验
  "prettier.eslintIntegration": true, // 去掉代码结尾的分号
  "prettier.semi": false, // 使用单引号替代双引号
  "prettier.singleQuote": true, // 让函数(名)和后面的括号之间加个空格 // "javascript.format.insertSpaceBeforeFunctionParenthesis": false, // html格式化,这个按用户自身习惯选择
  "vetur.format.defaultFormatter.html": "js-beautify-html", // 让vue中的js按编辑器自带的ts格式进行格式化
  "vetur.format.defaultFormatter.js": "vscode-typescript",
  "vetur.format.defaultFormatterOptions": {
    "js-beautify-html": {
      "wrap_attributes": "force-aligned" // vue组件中html代码格式化样式
    }
  },
  "search.exclude": {
    "**/node_modules": true,
    "**/bower_components": true,
    "**/dist": true
  },
  "emmet.syntaxProfiles": {
    "javascript": "jsx",
    "vue": "html",
    "vue-html": "html"
  }, // 设置字体 // "editor.fontFamily": "'Droid Sans Mono', 'Courier New', monospace, 'Droid Sans Fallback'", // vscode 程序title位置显示内容,这里设置了显示路径
  "window.title": "${dirty}${activeEditorMedium}${separator}${rootName}", // 编辑器建议 显示在头部
  "editor.snippetSuggestions": "top",
  "editor.suggestSelection": "first",
  "vsintellicode.modify.editor.suggestSelection": "automaticallyOverrodeDefaultValue",
  "editor.codeActionsOnSave": {
    "source.fixAll.eslint": true
  },
  "beautify.ignore": "",
  "editor.fontSize": 20
}
1
2
3
4
5
6
7
8
9
10
11
12
13
14
15
16
17
18
19
20
21
22
23
24
25
26
27
28
29
30
31
32
33
34
35
36
37
38
39
40
41
42
43
44
45
46
47
48
49
50
51
52
53
# 3.2 实用功能
代码对比
右键需要比较的文件弹框选择
选择以进行比较右键目标文件弹框选择
与已选项目进行比较
# 3.3 批量替换
支持使用正则方式进行复杂场景的替换,对大型项目中批量修改非常高效
# 3.4 调试代码
可以直接在 vscode 中 debugger,更加直观感受整个代码运行流程
# 4.谷歌浏览器
- 跨域,方便本地开发解决跨域问题参考资料 (opens new window)
- 相关调试技巧:developer tool
- 查看页面性能:LightHouse
- vue 代码调试插件:vue-devtools
- vue 页面性能测试插件:Vue performance Devtool
# 5.npm
注意
推荐在 vscode bash 中运行相关命令
rm -rf node_modules #一些常见的命令操作需不能在cmd中执行,如删除依赖这个命令需要在bash中使用
# 5.1 npm
npm(node package manage)是 nodejs 自带的包管理工具。
package.json
- ~会匹配最近的小版本依赖包,比如~1.2.3 会匹配所有 1.2.x 版本,但是不包括 1.3.0
- ^会匹配最新的大版本依赖包,比如^1.2.3 会匹配所有 1.x.x 的包,包括 1.3.0,但是不包括 2.0.0
- *这意味着安装最新版本的依赖包
常用命令
npm init                # 生成package.json文件(需要手动配置)
npm init -y             # 生成package.json文件(使用默认配置)
npm i                   # 一键安装package.json下的依赖包
npm i xxx               # 在项目中安装包名为xxx的依赖包(配置在dependences下)
npm i xxx --save        # 在项目中安装包名为xxx的依赖包(配置在dependencies下)
npm i xxx --save-dev    # 在项目中安装包名为xxx的依赖包(配置在devDependencies下)
npm i -g xxx            # 全局安装包名为 xxx的依赖包
npm run xxx             # 运行package.json中scripts下的命令
npm update xxx          # 更新某个包
npm home xxx            # 打开xxx包的主页
npm repo xxx            # 打开xxx包的代码仓库
npm publish             # 将当前模块发布到npmjs.com,需要先登录
npm view xxx            # 查看当前依赖的版本
npm view xxx version    # 查看当前依赖仓库的版本
1
2
3
4
5
6
7
8
9
10
11
12
13
14.npmrc
engine-strict=false
registry=https://mirrors.cloud.tencent.com/npm/
npmmirror:registry=registry https://registry.npmmirror.com/
2
3
# 5.2 cnpm
npm i --registry=https://registry.npm.taobao.org #可以在安装包的时候指定下载源
npm config set registry https://registry.npm.taobao.org #改变全局默认下载地址
npm install cnpm -g --registry=https://registry.npm.taobao.org
2
3
- cnpm 不受 package-lock.json 影响,只会根据 package.json 进行下载
# 5.3 yarn
- 有时候通过 cnpm 下载的包莫名不能用, 可以换用 yarn 解决这个问题
# 5.4 pnpm
- pnpm 速度快
总结
熟悉常用的 vue 项目开发工具,以及常见的配置,保障项目的一致性
← Vue 的工程化流程 初始化(创建项目) →