# Serverless
# 1.Serverless 是什么?
# 1.1 Serverless 是什么?
- 无服务器架构几乎封装了所有底层资源管理和系统运维工作
- 服务器部署、扩缩容、运维、监控报警交由云服务器厂商来做
- 前端开发只关注业务,不关注服务器
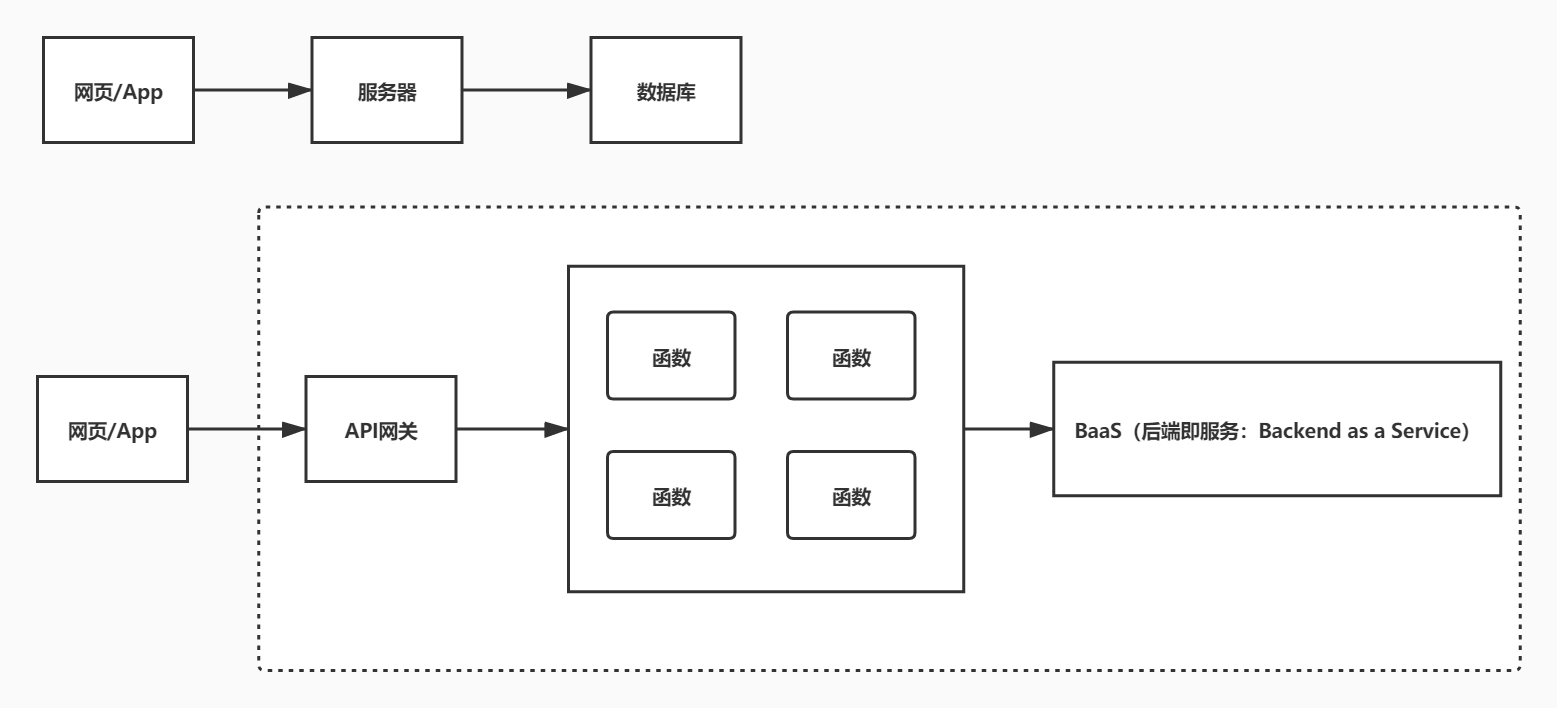
# 1.2 云函数
- 函数服务
# 2.Serverless framework
- Serverless Framework 是业界非常受欢迎的无服务器应用框架,开发者无需关心底层资源即可部署完整可用的 Serverless 应用架构
- Serverless Framework 具有资源编排、自动伸缩、事件驱动等能力,覆盖编码、调试、测试、部署等全生命周期,帮助开发者通过联动云资源,迅速构建 Serverless 应用
- Serverless Framework
- Serverless Framework 文档
- 安装 Serverless Framework
cnpm i -g serverless
cnpm update -g serverless
serverless -v
1
2
3
2
3
# 3.Serverless Components
- Serverless Components 是支持多个云资源编排和组织的场景化解决方案,主要基于客户的具体场景,如 Express 框架支持,网站部署等
- Serverless Components 可以有效简化云资源的配置和管理,将网关、COS 和 CAM 等产品联动起来,让客户更多关注场景和业务
- Serverless Framework Components 最佳实践
- @serverless/tencent-scf 腾讯云云函数组件
- @serverless/tencent-express 快速部署基于 express.js 的后端服务到腾讯云函数的组件
- @serverless/tencent-website 快速部署静态网站到腾讯云的组件
# 3.1 云函数 SCF 组件
- 腾讯云 SCF 云函数组件通过使用 Tencent Serverless Framework,基于云上 Serverless 服务(云函数及触发器等),实现
0配置,便捷开发,快速部署您的第一个云函数 - 查看 SCF
- 全量配置
# 3.1.1 serverless.yml
- js-yaml
tencent-scf\serverless.yml
  # serverless.yml
  cmopnent: scf #(必填)引用component的名称,当前用到的是tencent-scf组件
  name: scfdemo #(必填)该组件创建的实例名称
  org: test # (可选),用于记录组织信息,默认值为您的腾讯云账户 appid
  app: scfApp #(可选)该SCF应用名称
  stage: dev #(可选)用于区分环境信息,默认值是dev

  inputs:
    name: scfFunctionName
    src: ./src
    runtime: Nodejs10.15 # 云函数运行环境
    region: ap-beijing
    handler: index.main_handler
    events:
      - apigw:
        name: serverless_api
        parameters:
          protocols:
            - http
            - https
          serviceName:
          description: The service of Serverless Framework
          environment: release
          endpoints:
            - path: /index
            method: GET
1
2
3
4
5
6
7
8
9
10
11
12
13
14
15
16
17
18
19
20
21
22
23
24
25
26
2
3
4
5
6
7
8
9
10
11
12
13
14
15
16
17
18
19
20
21
22
23
24
25
26
# 3.1.2 src/index.js
"use strict"
exports.main_handler = async (event, context, callback) => {
  console.log("Hello World")
  console.log(event)
  console.log(event["non-exist"])
  console.log(context)
  return "Hello World"
}
1
2
3
4
5
6
7
8
2
3
4
5
6
7
8
# 3.1.3 tencent-scf.env
tencent-scf.env
- 当前默认支持 cli 扫描二维码登录,如果希望配置持久的环境变量/密钥信息,也可以本地创建.env 文件:
- API 密钥管理
TENCENT_APP_ID=
TENCENT_SECRET_ID=
TENCENT_SECRET_KEY=
1
2
3
2
3
# 3.1.4 部署
sls --debug
1
# 3.2 API 网关组件
- API 网关是将所有 API 的调用统一接入 API 网关层,由网关层负责接入和输出
- API 网关是用户与服务器的连接器,负责 API 接口的托管,实现安全防护和统一监控
- API 网关组件是 serverless-tencent 组件库中的基础组件之一,您可以通过该组件快速且方便地创建、配置和管理腾讯云的 API 网关产品
- 通过 API 网关组件,您可以对一个 API 服务/接口进行完整的创建、配置、部署和删除等操作
- 全量配置
# 3.2.1 tencent-api\serverless.yml
#serverless.yml
restApi:
  component: "@serverless/tencent-apigateway"
  inputs:
    region: ap-beijing
    protocol: http
    serviceName: serverless
    environment: release
    endpoints:
      - path: /users
        method: GET
        function:
          functionName: scfFunctionName
1
2
3
4
5
6
7
8
9
10
11
12
13
2
3
4
5
6
7
8
9
10
11
12
13
# 3.2.2 布署
sls --debug
1
http://service-mpkd1e88-1258145019.gz.apigw.tencentcs.com/users
# 3.3 布署静态网站
完整配置
# 3.3.1 serverless.yml
staticwebsite\serverless.yml
component: website # (必填) 引用 component 的名称,当前用到的是 tencent-website 组件
name: websitedemo # (必填) 该 website 组件创建的实例名称
org: test # (可选) 用于记录组织信息,默认值为您的腾讯云账户 appid
app: websiteApp # (可选) 该 website 应用名称
stage: dev # (可选) 用于区分环境信息,默认值是 dev

inputs:
  code:
    src: ./code
    index: index.html
    error: index.html
  region: ap-beijing
  bucketName: my-bucket
1
2
3
4
5
6
7
8
9
10
11
12
13
2
3
4
5
6
7
8
9
10
11
12
13
# 3.3.2 index.html
staticwebsite\code\index.html
<!DOCTYPE html>
<html lang="en">
  <head>
    <meta charset="UTF-8" />
    <meta name="viewport" content="width=device-width, initial-scale=1.0" />
    <title>Document</title>
  </head>

  <body>
    static website
  </body>
</html>
1
2
3
4
5
6
7
8
9
10
11
12
2
3
4
5
6
7
8
9
10
11
12
# 3.4 布署 express 项目
全量配置
# 3.4.1 创建项目
mkdir tencent-express
cd tencent-express
npm init -y
cnpm i express -S
1
2
3
4
2
3
4
# 3.4.2 serverless.yml
tencent-express\serverless.yml
org: orgDemo # (optional) serverless dashboard org. default is the first org you created during signup.
app: appDemo # (optional) serverless dashboard app. default is the same as the name property.
stage: dev # (optional) serverless dashboard stage. default is dev.
component: express # (required) name of the component. In that case, it's express.
name: expressDemo # (required) name of your express component instance.

inputs:
  src: ./
  region: ap-beijing
  runtime: Nodejs10.15
  apigatewayConf:
    protocols:
      - http
      - https
    environment: release
1
2
3
4
5
6
7
8
9
10
11
12
13
14
15
2
3
4
5
6
7
8
9
10
11
12
13
14
15
# 3.4.3 sls.js
tencent-express\sls.js
const express = require("express")
const path = require("path")
const app = express()

app.get(`/*`, (req, res) => {
  res.send("i am express")
})
module.exports = app
1
2
3
4
5
6
7
8
2
3
4
5
6
7
8
# 3.5 布署 express+layer 项目
层管理 打包压缩阶段
# 3.5.1 serverless.yml
tencent-express-layer\serverless.yml
org: orgDemo # (optional) serverless dashboard org. default is the first org you created during signup.
app: appDemo # (optional) serverless dashboard app. default is the same as the name property.
stage: dev # (optional) serverless dashboard stage. default is dev.
component: express # (required) name of the component. In that case, it's express.
name: expressLayerDemo # (required) name of your express component instance.

inputs:
  src:
    src: ./src # (optional) path to the source folder. default is a hello world app.
    exclude:
      - .env
  region: ap-beijing
  layers:
    - name: nodeLayer
      version: 1
  runtime: Nodejs10.15
  apigatewayConf:
    protocols:
      - http
      - https
    environment: release
1
2
3
4
5
6
7
8
9
10
11
12
13
14
15
16
17
18
19
20
21
2
3
4
5
6
7
8
9
10
11
12
13
14
15
16
17
18
19
20
21
# 3.5.2 src\sls.js
tencent-express-layer\src\sls.js
const express = require("express")
const path = require("path")
const app = express()

app.get(`/*`, (req, res) => {
  res.sendFile(path.join(__dirname, "index.html"))
})

app.use(function(err, req, res) {
  console.error(err)
  res.status(500).send("Internal Serverless Error")
})

module.exports = app
1
2
3
4
5
6
7
8
9
10
11
12
13
14
2
3
4
5
6
7
8
9
10
11
12
13
14
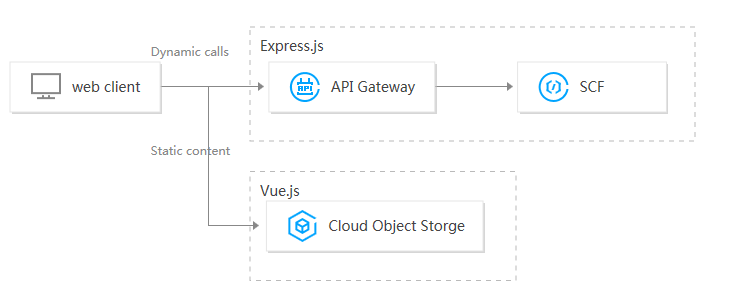
# 3.6 部署 Vue+Express 全栈应用
- 全栈组件(Vue.js+Express.js)用于通过多个 Serverless Components 部署 Serverless 全栈应用程序
- 可以帮助开发者更方便快捷的部署 Serverless 应用,例如利用后端 API 与前端 Vue.js 结合等场景
- serverless Express.js 后端:由腾讯云 Serverless Cloud Function(云函数 SCF) 和腾讯云 API 网关提供相关能力,支持 express.js 框架,帮助开发者架构自己的项目和路由。
- serverless Vue.js 前端:由腾讯云 Cloud Object Storage(对象存储 COS)提供相关存储能力,通过后端 API 传递到前端,并使用 Vue.js 做相关渲染
# 3.6.1 serverless.yml
vue-fullstack\serverless.yml
name: tencent-fullstack-vue-application

dashboard:
  component: "@serverless/tencent-website"
  inputs:
    code:
      src: dist
      root: dashboard
      hook: npm run build
    env:
      apiUrl: ${api.url}
api:
  component: "@serverless/tencent-express"
  inputs:
    code: ./api
    functionName: tencent-fullstack-vue-api
    apigatewayConf:
      protocols:
        - https
1
2
3
4
5
6
7
8
9
10
11
12
13
14
15
16
17
18
19
2
3
4
5
6
7
8
9
10
11
12
13
14
15
16
17
18
19
# 3.6.2 api\package.json
vue-fullstack\api\package.json
{
  "name": "tencent-fullstack-vue-api",
  "version": "0.0.0",
  "dependencies": {
    "cors": "^2.8.5",
    "express": "^4.17.1"
  },
  "license": "ISC"
}
1
2
3
4
5
6
7
8
9
2
3
4
5
6
7
8
9
# 3.6.3 api\app.js
vue-fullstack\api\app.js
"use strict"
const express = require("express")
const cors = require("cors")
const app = express()
app.use(cors())

app.get("/", (req, res) => {
  res.send(JSON.stringify({ message: `珠峰架构` }))
})

module.exports = app
1
2
3
4
5
6
7
8
9
10
11
2
3
4
5
6
7
8
9
10
11
# 3.6.4 生成前端项目
vue create dashboard
1
# 3.6.5 src\App.vue
vue-fullstack\dashboard\src\App.vue
<template>
  <div id="app">{{ message }}</div>
</template>

<script>
import "../env"
export default {
  name: "App",
  data() {
    return {
      message: "message",
    }
  },
  mounted() {
    fetch(window.env.apiUrl)
      .then((res) => res.json())
      .then((result) => {
        this.message = result.message
      })
  },
}
</script>
1
2
3
4
5
6
7
8
9
10
11
12
13
14
15
16
17
18
19
20
21
22
2
3
4
5
6
7
8
9
10
11
12
13
14
15
16
17
18
19
20
21
22
# 2.RBAC
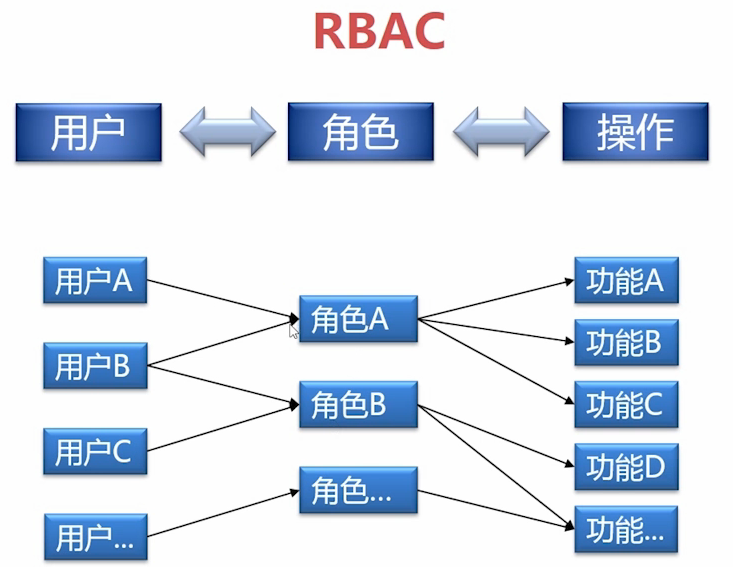
- 基于角色的权限访问控制(Role-Based Access Control)
- RBAC(Role-Based Access Control,基于角色的访问控制),就是用户通过角色与权限进行关联
- 一个用户拥有若干角色,每一个角色拥有若干权限。这样,就构造成用户-角色-权限的授权模型
- 在这种模型中,用户与角色之间,角色与权限之间一般是多对多的关系
- 在 RBAC 中最重要的概念包括:用户(User),角色(Role),权限(Permission)
# 2.1 示意图
rbac
# 2.2 表设计
# 2.2.1 用户表(user)
| 字段 | 字段名 | 类型 | 默认 |
|---|---|---|---|
| id | ID | int(11) | |
| userName | 用户名 | varchar(255) | |
| password | 密码 | varchar(255) |
CREATE TABLE `user`  (
  `id` int(11) NOT NULL AUTO_INCREMENT,
  `userName` varchar(255),
  `password` varchar(255),
  PRIMARY KEY (`id`)
)

INSERT INTO `user` VALUES (1, 'isadmin', '123456');
INSERT INTO `user` VALUES (2, 'isuser', '123456');
1
2
3
4
5
6
7
8
9
2
3
4
5
6
7
8
9
# 2.2.2 角色表(role)
| 字段 | 字段名 | 类型 | 默认 |
|---|---|---|---|
| id | ID | int(11) | |
| name | 名称 | varchar(255) | |
| desc | 描述 | varchar(255) |
CREATE TABLE `role`  (
  `id` int(11) NOT NULL AUTO_INCREMENT,
  `name` varchar(255) ,
  `desc` varchar(255) ,
  PRIMARY KEY (`id`)
)

INSERT INTO `role` VALUES (1, 'admin', '管理员');
INSERT INTO `role` VALUES (2, 'user', '普通用户');
1
2
3
4
5
6
7
8
9
2
3
4
5
6
7
8
9
# 2.2.3 权限表(permission)
| 字段 | 字段名 | 类型 | 默认 |
|---|---|---|---|
| id | ID | int(11) | |
| name | 名称 | varchar(255) | |
| parent_id | 父 ID | int(11) | |
| icon | 图标 | varchar(255) | |
| key | 路径 | varchar(255) | |
| type | 类型 | varchar(32) |
CREATE TABLE `permission`  (
  `id` int(11) NOT NULL AUTO_INCREMENT,
  `name` varchar(255) ,
  `parent_id` int(11) NULL DEFAULT NULL,
  `icon` varchar(255) ,
  `key` varchar(255) ,
  `type` varchar(255) ,
  PRIMARY KEY (`id`)
);

INSERT INTO `permission` VALUES (1, '授权平台', 0, 'desktop', '/api', 'menu');
INSERT INTO `permission` VALUES (2, '角色管理', 1, 'team', '/api/role', 'menu');
INSERT INTO `permission` VALUES (3, '用户管理', 1, 'user', '/api/user', 'menu');
INSERT INTO `permission` VALUES (4, '权限管理', 1, 'idcard', '/api/resource', 'menu');
INSERT INTO `permission` VALUES (5, '添加用户', 3, 'team', '/api/user/add', 'button');
INSERT INTO `permission` VALUES (6, '删除用户', 3, 'team', '/api/user/delete', 'button');
1
2
3
4
5
6
7
8
9
10
11
12
13
14
15
16
2
3
4
5
6
7
8
9
10
11
12
13
14
15
16
# 2.2.4 角色用户表(role_user)
| 字段 | 字段名 | 类型 |
|---|---|---|
| role_id | 角色 | ID |
| user_id | 用户 | ID |
DROP TABLE IF EXISTS `role_user`;
CREATE TABLE `role_user`  (
  `role_id` int(11) NOT NULL,
  `user_id` int(11) NOT NULL,
  PRIMARY KEY (`user_id`, `role_id`)
)

INSERT INTO `role_user` VALUES (1, 1);
INSERT INTO `role_user` VALUES (2, 2);
1
2
3
4
5
6
7
8
9
2
3
4
5
6
7
8
9
# 2.2.5 角色权限(role_permission)
| 字段 | 字段名 | 类型 |
|---|---|---|
| role_id | 角色 ID | int(11) |
| permission_id | 资源 ID | int(11) |
CREATE TABLE `role_permission`  (
  `role_id` int(11) NOT NULL,
  `permission_id` int(255) NOT NULL,
  PRIMARY KEY (`role_id`, `permission_id`)
)

INSERT INTO `role_permission` VALUES (1, 1);
INSERT INTO `role_permission` VALUES (1, 2);
INSERT INTO `role_permission` VALUES (1, 3);
INSERT INTO `role_permission` VALUES (1, 4);
INSERT INTO `role_permission` VALUES (1, 5);
INSERT INTO `role_permission` VALUES (1, 6);
INSERT INTO `role_permission` VALUES (2, 1);
INSERT INTO `role_permission` VALUES (2, 4);
1
2
3
4
5
6
7
8
9
10
11
12
13
14
2
3
4
5
6
7
8
9
10
11
12
13
14
# 2.2.6 数据库脚本
cms.sql
# 3.egg.js
tencent-egg
# 3.1. 初始化项目
mkdir egg-cms && cd egg-cms
cnpm init egg --type=simple
cnpm i
1
2
3
2
3
# 3.2. 添加模块
mysql
redis
cd egg-cms
npm install egg-sequelize mysql2 egg-jwt egg-redis --save
1
2
3
4
2
3
4
# 3.3. config\plugin.js
"use strict"

module.exports = {
  sequelize: {
    enable: true,
    package: "egg-sequelize",
  },
  jwt: {
    enable: true,
    package: "egg-jwt",
  },
  redis: {
    enable: true,
    package: "egg-redis",
  },
}
1
2
3
4
5
6
7
8
9
10
11
12
13
14
15
16
2
3
4
5
6
7
8
9
10
11
12
13
14
15
16
# 3.4. config\config.default.js
/* eslint valid-jsdoc: "off" */

'use strict';

/**
 * @param {Egg.EggAppInfo} appInfo app info
 */
module.exports = appInfo => {
  /**
   * built-in config
   * @type {Egg.EggAppConfig}
   **/
  const config = exports = {};

  // use for cookie sign key, should change to your own and keep security
  config.keys = appInfo.name + '_1588409777990_9883';

  // add your middleware config here
  config.middleware = [];

  // add your user config here
  const userConfig = {
+    security: {
+      csrf: false
+    },
+    sequelize: {
+      dialect: "mysql",
+      host: "localhost",
+      port: "3306",
+      database: "egg-cms",
+      username: "root",
+      password: "5f8b8a5d650637f8"
+    },
+    redis: {
+      client: {
+        port: 6379,          // Redis port
+        host: '127.0.0.1',   // Redis host
+        password: 'auth',
+        db: 0,
+      },
+    }
  };

  return {
    ...config,
    ...userConfig,
  };
};
1
2
3
4
5
6
7
8
9
10
11
12
13
14
15
16
17
18
19
20
21
22
23
24
25
26
27
28
29
30
31
32
33
34
35
36
37
38
39
40
41
42
43
44
45
46
47
48
2
3
4
5
6
7
8
9
10
11
12
13
14
15
16
17
18
19
20
21
22
23
24
25
26
27
28
29
30
31
32
33
34
35
36
37
38
39
40
41
42
43
44
45
46
47
48
# 3.5. model\user.js
app\model\user.js
module.exports = (app) => {
  const { STRING, INTEGER, DATE } = app.Sequelize
  const User = app.model.define("user", {
    id: { type: INTEGER, primaryKey: true, autoIncrement: true },
    userName: STRING(30),
    password: STRING(30),
    created_at: DATE,
    updated_at: DATE,
  })
  return User
}
1
2
3
4
5
6
7
8
9
10
11
2
3
4
5
6
7
8
9
10
11
# 3.6. app\controller\home.js
jwt.io app\controller\home.js
"use strict"

const Controller = require("egg").Controller

class HomeController extends Controller {
  async index() {
    const { ctx } = this
    ctx.body = "hi, egg"
  }
  async currentUser() {
    const { ctx } = this
    const { user } = ctx.state
    this.ctx.body = {
      name: user.userName,
      avatar: "http://img.zhufengpeixun.cn/tuizi.jpg",
      userid: user.id,
    }
  }
  async login() {
    const { ctx, app } = this
    let { userName, password } = ctx.request.body
    const users = await ctx.model.User.findAll({
      where: { userName, password },
      limit: 1,
    })
    if (users.length > 0) {
      let user = users[0]
      ctx.status = 200
      const token = app.jwt.sign(
        {
          id: user.id,
          userName: user.userName,
        },
        app.config.jwt.secret,
        {
          expiresIn: "1h",
        }
      )
      await app.redis.set(`token_${user.id}`, token)
      ctx.body = {
        status: "ok",
        type: "account",
        currentAuthority: "admin",
        token,
      }
    } else {
      ctx.body = {
        status: "error",
      }
    }
  }
}

module.exports = HomeController
1
2
3
4
5
6
7
8
9
10
11
12
13
14
15
16
17
18
19
20
21
22
23
24
25
26
27
28
29
30
31
32
33
34
35
36
37
38
39
40
41
42
43
44
45
46
47
48
49
50
51
52
53
54
2
3
4
5
6
7
8
9
10
11
12
13
14
15
16
17
18
19
20
21
22
23
24
25
26
27
28
29
30
31
32
33
34
35
36
37
38
39
40
41
42
43
44
45
46
47
48
49
50
51
52
53
54
# 3.7. app\router.js
app\router.js
module.exports = (app) => {
  const { router, controller, jwt } = app
  router.get("/", controller.home.index)
  ;+router.post("/api/login/account", controller.home.login)
  ;+router.get("/api/currentUser", jwt, controller.home.currentUser)
}
1
2
3
4
5
6
2
3
4
5
6
# 3.8. app.js
app.js
class AppBootHook {
  constructor(app) {
    this.app = app
  }

  async willReady() {
    await this.app.model.sync({ logging: console.log, force: true })
    await this.app.model.query(
      "INSERT INTO users (user_name, password) VALUES ('admin', '123456')"
    )
  }
}

module.exports = AppBootHook
1
2
3
4
5
6
7
8
9
10
11
12
13
14
2
3
4
5
6
7
8
9
10
11
12
13
14
# 4. 前端项目
# 4.1. 启动项目
pro.ant.design
create-umi
umi -v
cnpm create umi
1
2
3
4
2
3
4
# 4.2 config\config.ts
config\config.ts
export default {
  dev: {
+    '/server/api/': {
+      target: 'http://127.0.0.1:7001',
+      changeOrigin: true,
+      pathRewrite: { '^/server': '' },
+    },
    /* '/api/': {
      target: 'https://preview.pro.ant.design',
      changeOrigin: true,
      pathRewrite: { '^': '' },
    }, */
  },
  test: {
    '/api/': {
      target: 'https://preview.pro.ant.design',
      changeOrigin: true,
      pathRewrite: { '^': '' },
    },
  },
  pre: {
    '/api/': {
      target: 'your pre url',
      changeOrigin: true,
      pathRewrite: { '^': '' },
    },
  },
};
1
2
3
4
5
6
7
8
9
10
11
12
13
14
15
16
17
18
19
20
21
22
23
24
25
26
27
28
2
3
4
5
6
7
8
9
10
11
12
13
14
15
16
17
18
19
20
21
22
23
24
25
26
27
28
# 4.3 services\login.ts
src\services\login.ts
export async function fakeAccountLogin(params: LoginParamsType) {
+  return request('/server/api/login/account', {
    method: 'POST',
    data: params,
  });
}
1
2
3
4
5
6
2
3
4
5
6
# 4.4 services\user.ts
src\services\user.ts
export async function queryCurrent(): Promise<any> {
+  return request('/server/api/currentUser');
}
1
2
3
2
3
# 4.5 models\login.ts
src\models\login.ts
effects: {
    *login({ payload }, { call, put }) {
      const response = yield call(fakeAccountLogin, payload);
      yield put({
        type: 'changeLoginStatus',
        payload: response,
      });
      // Login successfully
      if (response.status === 'ok') {
+        if (response.token) {
+          localStorage.setItem('token', response.token);
+        }
        const urlParams = new URL(window.location.href);
1
2
3
4
5
6
7
8
9
10
11
12
13
2
3
4
5
6
7
8
9
10
11
12
13
# 4.6 utils\request.ts
src\utils\request.ts
const request = extend({
  errorHandler, // 默认错误处理
  credentials: 'include', // 默认请求是否带上cookie
});
+request.interceptors.request.use((url: any, options: any) => {
+  if (localStorage.getItem('token')) {
+    options.headers.Authorization = 'Bearer ' + localStorage.getItem('token')
+  }
+  return { url, options };
+});
export default request;
1
2
3
4
5
6
7
8
9
10
11
2
3
4
5
6
7
8
9
10
11